Crusher
Zúzó

 |
 |
 |
 |
| Level 1 | Level 2 | Level 3 | Level 4 |
 |
 |
 |
| Level 5 | Level 6 | Level 7 |
- Summary
- The Crusher is a single target splash damaging defense unlocked at Builder Hall level 3.
- Every few seconds, the Crusher slams down, doing heavy damage to all ground units in its radius.
- The range of the Crusher is short and thus it excels against short-range troops such as Raged Barbarians and Boxer Giants but will be outranged by long-range troops such as the Sneaky Archer.
- The Crusher cannot attack air troops, such as the Beta Minion and Baby Dragon.
- Defensive Strategy
- Keeping the Crusher centered in the Builder Base helps protect it from ranged troops.
- Use Push Traps to push ranged units into the Crusher.
- You can make an opening in your village using Walls to lure ground troops so they can push them into the Crusher. The troops will not want to break the wall so they will go through the gap.
- You can put a Guard Post near a Crusher so the Guard Post troops lure your opponent’s troops into the Crusher to get crushed.
- Put good, short ranged defenses, such as the Double Cannon behind the Crusher (more towards the center of the base, where your opponent’s troops will have to go through the Crusher to get to it) to protect it.
- Try to avoid putting Crushers by walls as they cannot crush the melee over them , allowing the ranged units more time to destroy the Crusher before it can crush the melee units.
- Try to put Crushers near your Firecrackers and Air Bombs to protect them from the Skeletons of the Drop Ship, as they will not be able to destroy the Crusher easily and it will stall the Drop Ships, therefore your Firecrackers and Air Bombs to take it out.
- Offensive Strategy
- The Boxer Giant’s Power Punch ability can destroy a Crusher if there are enough of them at once.
- Use air troops to take down the Crusher if using a swarm attack. This is only for unprotected Crushers – watch out for Firecrackers, Air Bombs and the Archer in the Guard Post!
- To avoid a luring technique, as explained above, use Bombers to destroy walls and create another opening into a base away from the Crusher
- The Battle Machine can take out the Crusher before it does massive damage to units. However, with the help of other defenses, the battle machine will likely be at low hitpoints or taken out by the Crusher, even if the ability, Electric Hammer, is used.
- You can take advantage of the Crusher’s cooldown time to make it crush a few Raged Barbarian then swarming it with multiple Raged Barbarians to take it down before it has chance to crush the rest of the Raged Barbarians again. This technique requires precise timing and can ruin your attack if not executed correctly.
- Upgrade Differences
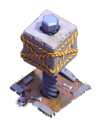
- At level 1, the Crusher looks like a mossy stone attached to a large screw emerging from a hole in the ground.
- At level 2, the stone has wooden planks attached to its sides. The bolt at the top turns into metal one.
- At level 3, the planks are replaced with ropes and the moss is gone. Some stones appear around the crushing platform.
- At level 4, the ropes are replaced with metal blue bands.
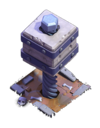
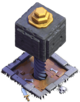
- At level 5, the crushing stone becomes larger, the bolt at the top of the stone becomes gold, the hole receives a golden fitting and the crushing area is now completely surrounded by stone.
- At level 6, the metal bands are now gold, and the crushing stone is slightly darker.
- At level 7, the metal bands disappear and the crushing stone turns black. An extra bolt also appears at the top.
- Trivia
- The Crusher is the only defensive building (from both bases) that doesn’t shoot any kind of projectiles.
- Supercell were going to add a 2nd Crusher to Builder Hall level 7, but then they decided to add it at Builder Hall level 6.
- On 9/29/2017, the Crusher could no longer hit over walls, even if units are within its range.
- Ikonok leírása
| – Az ikont lenyomva információkat mutat meg az ágyúról, mint: Szint, Másodpercenkénti sebzés, Lövésenkénti sebzés, Életerő, Hatósugár, Sebzéstípus, és Kedvenc célpont. | |
| – Az ikont lenyomva a következő szinte fejleszti az ágyút, ha van elég nyersanyagod és egy szabad Építőd. Ha az ágyú elérte lehető legnagyobb szintjét, az ikon nem látszódik. | |
| – Az ikont lenyomva azonnal befejezi a fejlesztést, a látható számú Gemért cserébe. Az ikon csak akkor látszódik, ha egy fejlesztés van folyamatban. | |
| – Az ikont lenyomva megszakítja a folyamatban lévő fejlesztést. Az ikon csak akkor látszódik, ha egy fejlesztés van folyamatban. |
| Városháza szint | 1 | 2 | 3 | 4 | 5 | 6 | 7 |
|---|---|---|---|---|---|---|---|
| Elérhető | 0 | 0 | 1 | 1 | 1 | 2 | 2 |
| Méret |
|---|
| 3×3 |
| Level |
Másodpercenkénti sebzés |
Lövésenkénti sebzés |
Életerő |
Ár |
Építési idő |
Kapott Experience |
Builder Hall szint szükséges |
|---|---|---|---|---|---|---|---|
| 1 | 142 | 500 | 1,000 | 120,000 | 2 óra | 84 | 3 |
| 2 | 157 | 550 | 1,150 | 180,000 | 5 óra | 134 | 3 |
| 3 | 172 | 605 | 1,323 | 220,000 | 12 óra | 207 | 4 |
| 4 | 190 | 666 | 1,521 | 350,000 | 1 nap | 293 | 4 |
| 5 | 209 | 733 | 1,749 | 1,200,000 | 2 nap | 415 | 5 |
| 6 | 230 | 806 | 2,011 | 1,500,000 | 3 nap | 509 | 6 |
| 7 | 253 | 887 | 2,313 | 2,400,000 | 3 nap | 509 | 7 |
| Hatótávolság |
Támadási sebesség |
Sebzés típus |
Célpont |
|---|---|---|---|
| 3 | 3.5 másodperc | Területi sebzés | Földi |